Require Batch Download R Google Earth Engine
You can export images, map tiles, tables and video from Earth Engine. The exports can be sent to your Google Drive account, to Google Cloud Storage or to a new Earth Engine asset.
To use Google Cloud Storage (a fee-based service), you'll need to set up a project, enable billing for the project, and create a storage bucket. See the Cloud Storage Quickstart page for instructions. See this guide for information on storage bucket naming. Data exported to a Cloud Storage bucket will have the bucket's default object Access Control List (ACL). You must have write permission for the specified bucket.
The following sections describe each type of export in detail.
Exporting images
You can export images from Earth Engine in GeoTIFF or TFRecord format. See Configuration Parameters for more output options.
to Drive
To export an image to your Drive account, use Export.image.toDrive(). For example, to export portions of a Landsat image, define a region to export, then call Export.image.toDrive():
Code Editor (JavaScript)
// Load a landsat image and select three bands. var landsat = ee.Image('LANDSAT/LC08/C01/T1_TOA/LC08_123032_20140515') .select(['B4', 'B3', 'B2']); // Create a geometry representing an export region. var geometry = ee.Geometry.Rectangle([116.2621, 39.8412, 116.4849, 40.01236]); // Export the image, specifying scale and region. Export.image.toDrive({ image: landsat, description: 'imageToDriveExample', scale: 30, region: geometry }); When this code is run, an export task will be created in the Code Editor Tasks tab. Click the Run button next to the task to start it. (Learn more about the Task Manager from the Code Editor section). The image will be created in your Drive account with the specified fileFormat.
to Cloud Storage
To export an image to a Google Cloud Storage bucket, use Export.image.toCloudStorage(). To export the Landsat image in the previous example to Cloud Storage instead of Drive, use:
Code Editor (JavaScript)
// Export the image to Cloud Storage. Export.image.toCloudStorage({ image: landsat, description: 'imageToCloudExample', bucket: 'your-bucket-name', fileNamePrefix: 'exampleExport', scale: 30, region: geometry }); As with exports to Drive, start the export from the Tasks tab.
to Asset
To export an image to an asset in your Earth Engine assets folder, use Export.image.toAsset(). To manage your Earth Engine assets, or check how much of your storage quota is in use, use the Asset Manager. The following example illustrates exporting portions of a Landsat image using different pyramiding policies for the same band. The pyramiding policy indicates how Earth Engine computes lower-resolution versions of the asset. Learn more about how Earth Engine handles multiple resolutions in the scale doc.
Code Editor (JavaScript)
// Get band 4 from the Landsat image, copy it. var band4 = landsat.select('B4').rename('b4_mean') .addBands(landsat.select('B4').rename('b4_sample')) .addBands(landsat.select('B4').rename('b4_max')); // Export the image to an Earth Engine asset. Export.image.toAsset({ image: band4, description: 'imageToAssetExample', assetId: 'exampleExport', scale: 30, region: geometry, pyramidingPolicy: { 'b4_mean': 'mean', 'b4_sample': 'sample', 'b4_max': 'max' } }); You can provide a default pyramiding policy for every band that isn't explicitly specified by using the '.default' key. You may also pass in just the '.default' key. For example, to make all bands default to the 'sample' pyramiding policy, use {'.default': 'sample'}.
Configuration parameters
Observe that the dictionary of configuration parameters passed to Export.image includes scale (in meters) and the export region as an ee.Geometry. The exported image will cover the specified region with pixels at the specified scale. If not explicitly specified, the CRS of the output will be taken from the first band of the image to be exported.
You may also specify the dimensions, crs and/or crsTransform of the exported image. See the glossary for more information on crs and crsTransform. For example, to get a block of pixels precisely aligned to another data source, specify dimensions, crs and crsTransform. To get a block of pixels of predefined size (for example a 256x256 thumbnail image) that covers a region, specify dimensions and region.
You can specify image output format (if the destination is not toAsset()) with the fileFormat parameter ('GeoTIFF' by default).
formatOptions parameter
Other configuration options are set with the formatOptions parameter, which should be a dictionary keyed by other format options, specific to each fileFormat as described below.
GeoTiff
to export a cloud optimized GeoTIFF, pass a JavaScript literal for formatOptions in which the cloudOptimized key is set to true. Continuing the previous example:
Code Editor (JavaScript)
// Export a cloud-optimized GeoTIFF. Export.image.toDrive({ image: landsat, description: 'imageToCOGeoTiffExample', scale: 30, region: geometry, fileFormat: 'GeoTIFF', formatOptions: { cloudOptimized: true } }); Cloud optimized GeoTIFFs can be releaded from Cloud Storage into an Image. See the Image overview docs for details.
TFRecord
See this page.
maxPixels
The maxPixels parameter is intended to prevent very large exports from inadvertently being created. If the default value is too low for your intended output image, you can increase maxPixels. For example:
Export.image.toDrive({ image: landsat, description: 'maxPixelsExample', scale: 30, region: geometry, maxPixels: 1e9 }); Large file exports
If the output image is large, it will be exported as multiple files. If you are exporting to GeoTIFF(s), the image is split into tiles. The filename of each tile will be in the form baseFilename-yMin-xMin where xMin and yMin are the coordinates of each tile within the overall bounding box of the exported image.
If you are exporting to TFRecord, the files will be appended by -00000, -00001,... -0000N for N+1 files. Maintaining this order is important if you intend to perform inference on the files and upload the predictions back to Earth Engine as an image. See uploading images as TFRecord files for details.
Exporting images as they appear in the Code Editor
To export imagery as rendered on screen in Earth Engine, create visualization images as demonstrated in the Visualization images and the Compositing and Mosaicking sections. Since the Code Editor uses the 'EPSG:3857' CRS, specify a CRS of 'EPSG:3857' in the export to get an image in the same projection as that displayed in the Code Editor map. See the section on configuring image exports for details on specifying the resolution and coordinate system of the output.
Exporting tables and vector data
You can export a FeatureCollection as CSV, SHP (shapefile), GeoJSON, KML, KMZ or TFRecord using Export.table. The FeatureCollection may represent vectors or simply a table of data. In the latter case, the features in the collection will have null geometry.
Note some additional constraints when working with some file formats, including:
- KML: A
FeatureCollectionexported to a KML file will have all the geometries transformed to unprojected (WGS84) coordinates. - SHP: A
FeatureCollectionexported to a Shapefile must contain features with the same geometry type and projection and must fit within the Shapefile size limits. Column names are truncated to 10 characters or fewer, and this must not create duplicate column names. - TFRecord: See this page.
to Drive
To export a FeatureCollection to your Drive account, use Export.table.toDrive(). For example:
Code Editor (JavaScript)
// Make a collection of points. var features = ee.FeatureCollection([ ee.Feature(ee.Geometry.Point(30.41, 59.933), {name: 'Voronoi'}), ee.Feature(ee.Geometry.Point(-73.96, 40.781), {name: 'Thiessen'}), ee.Feature(ee.Geometry.Point(6.4806, 50.8012), {name: 'Dirichlet'}) ]); // Export the FeatureCollection to a KML file. Export.table.toDrive({ collection: features, description:'vectorsToDriveExample', fileFormat: 'KML' }); Note that the output format is specified as KML to handle geographic data (SHP would also be appropriate for exporting a table with geometry). To export just a table of data, without any geographic information, export features with null geometry in CSV format. The following demonstrates using Export.table.toDrive() to get the results of a potentially long running reduction:
// Load a Landsat TOA image. var image = ee.Image('LANDSAT/LC08/T1_TOA/LC08_044034_20140318'); // Create an arbitrary rectangle. var region = ee.Geometry.Rectangle(-122.2806, 37.1209, -122.0554, 37.2413); // Get a dictionary of means in the region. var means = image.reduceRegion({ reducer: ee.Reducer.mean(), geometry: region, scale: 30 }); // Make a feature without geometry and set the properties to the dictionary of means. var feature = ee.Feature(null, means); // Wrap the Feature in a FeatureCollection for export. var featureCollection = ee.FeatureCollection([feature]); // Export the FeatureCollection. Export.table.toDrive({ collection: featureCollection, description: 'exportTableExample', fileFormat: 'CSV' }); Note that the format is set to 'CSV' in this example since there is no geometry in the output.
to Cloud Storage
To export a FeatureCollection to Cloud Storage, use Export.table.toCloudStorage(). For example, using the features defined previously:
Code Editor (JavaScript)
// Export a KML file to Cloud Storage. Export.table.toCloudStorage({ collection: features, description:'vectorsToCloudStorageExample', bucket: 'your-bucket-name', fileNamePrefix: 'exampleTableExport', fileFormat: 'KML' }); to Asset
To export a FeatureCollection as an Earth Engine asset, use Export.table.toAsset(). For example, using the features defined previously:
Code Editor (JavaScript)
// Export an ee.FeatureCollection as an Earth Engine asset. Export.table.toAsset({ collection: features, description:'exportToTableAssetExample', assetId: 'exampleAssetId', }); There are several limitations on the size and shape of Earth Engine table assets:
- Maximum of 100 million features
- Maximum of 1000 properties (columns)
- Maximum of 100,000 vertices for each row's geometry
- Maximum of 100,000 characters per string value
Exporting video
To export ordered image collections as video, where frames are defined by images in the collection, use Export.video(). You can configure the way the ImageCollection is turned into video by setting frame rate, scale and dimensions. The video will be encoded as an MP4.
to Drive
Export video to your Drive account with Export.video.toDrive(). For example, the following export makes a video from 20 years of Landsat imagery:
Code Editor (JavaScript)
// Load a Landsat 5 image collection. var collection = ee.ImageCollection('LANDSAT/LT05/C01/T1_TOA') // San Francisco Bay. .filter(ee.Filter.eq('WRS_PATH', 44)) .filter(ee.Filter.eq('WRS_ROW', 34)) // Filter cloudy scenes. .filter(ee.Filter.lt('CLOUD_COVER', 30)) // Get 20 years of imagery. .filterDate('1991-01-01','2011-12-30') // Need to have 3-band imagery for the video. .select(['B4', 'B3', 'B2']) // Need to make the data 8-bit. .map(function(image) { return image.multiply(512).uint8(); }); // Define an area to export. var polygon = ee.Geometry.Rectangle([-122.7286, 37.6325, -122.0241, 37.9592]); // Export (change dimensions or scale for higher quality). Export.video.toDrive({ collection: collection, description: 'sfVideoExample', dimensions: 720, framesPerSecond: 12, region: polygon }); Note that the frame rate and dimensions can be set from a dictionary of parameters passed to the export. Adjust these parameters to customize the video. Also note that the input ImageCollection is required to have 3-band (RGB), 8-bit images. In this example, the 8-bit, 3-band format is explicitly set. Alternatively, map a function which calls image.visualize() over the collection. See the section on Visualization images for details. Video exports can take a significant amount of time to complete, so it's not unusual to see the export task running for an extended period.
to Cloud Storage
To export a video to Cloud Storage, use Export.video.toCloudStorage(). For example, using the ImageCollection from the previous example:
// Export video to cloud storage. Export.video.toCloudStorage({ collection: collection, description: 'sfVideoExampleToCloud', bucket: 'your-bucket-name', dimensions: 720, framesPerSecond: 12, region: polygon }); Exporting maps
To export a publicly viewable map to Cloud Storage, use Export.map.toCloudStorage(). This function exports map tiles suitable for display using the Google Maps Platform API or Google Earth for web.
Generate a Google Maps Platform API Key
When you export map tiles from Earth Engine, we generate a sample HTML page stored in the output directory for you to preview the tiles using the Google Maps Platform JavaScript API. You can optionally provide a Google Maps Platform API Key at the time of export, which will be used for the sample viewer's API calls.
There are four steps to follow:
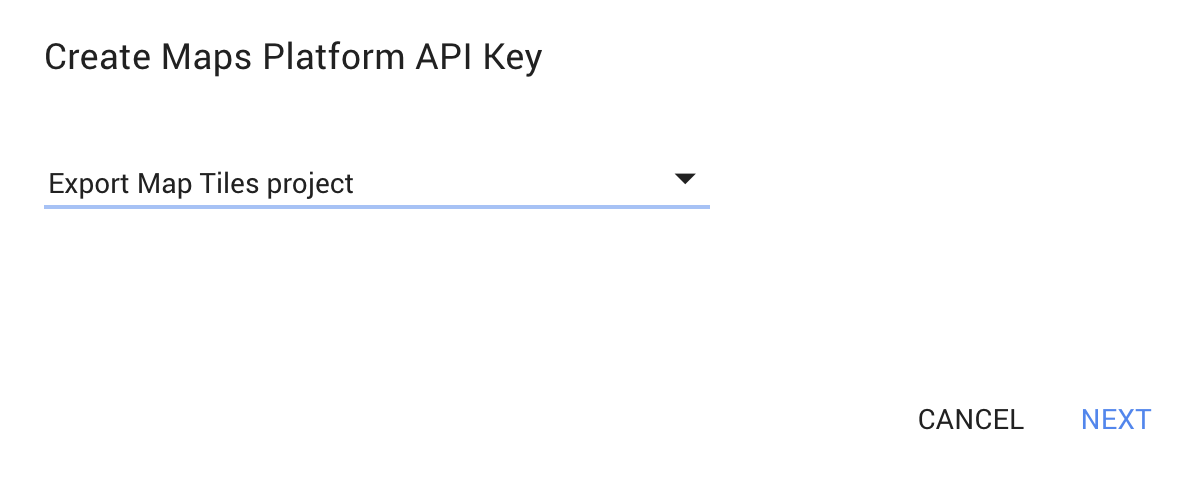
- Click the "Create Maps Platform API Key" button below.
- Select the Cloud project for your API key, and click
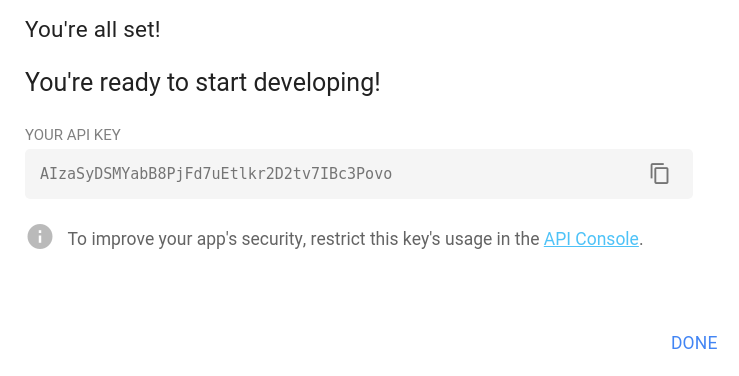
NEXT. - Click to copy the new key, and paste it into the Export map dialog in the Code Editor.
- (Recommended) Click the API Console link under the new key to set referrer restrictions. See referrer and application restrictions for more details.
Create Maps Platform API Key
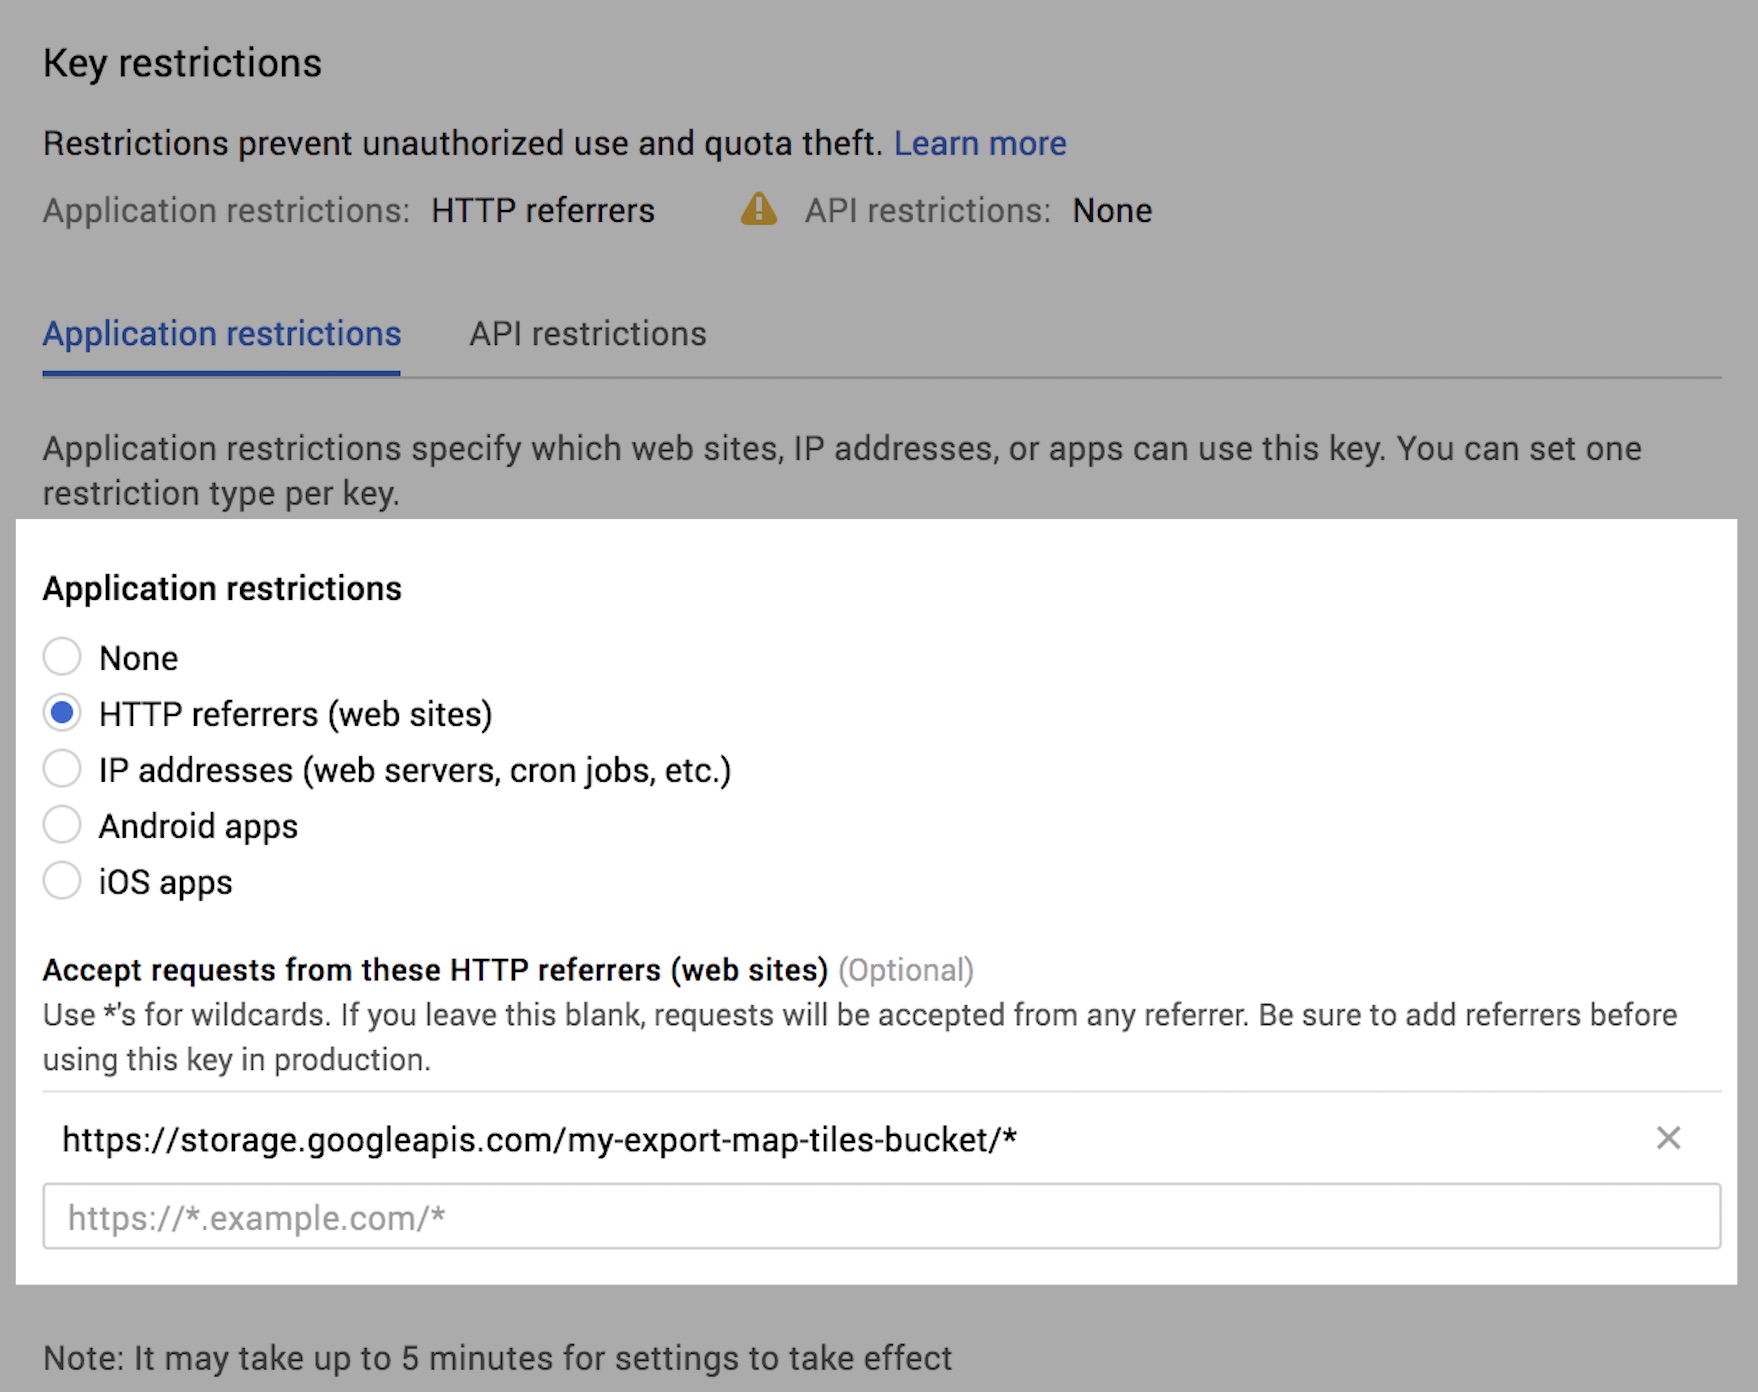
Adding Referrer Restrictions
Referrer restrictions ensure that only the designated app(s) can use your key. You can set or edit referrer restrictions at any time by visiting the Credentials page on the Cloud Console:
- Make sure the correct project name is selected in the dropdown at the top of the screen.
- Click the Maps Platform API key generated above to view the details for the key.
- Select HTTP referrers (websites), and specify the Cloud Storage bucket specified in
Export.map.toCloudStorageusing the following template:https://storage.googleapis.com/{bucket}/* - Hit Save. The "Saving..." indicator should appear.
To Cloud Storage
The following example exports a global accessibility map that displays a custom image over Kenya.
Code Editor (JavaScript)
// Load the global Accessibility to Cities image. var accessibility = ee.Image('Oxford/MAP/accessibility_to_cities_2015_v1_0'); // Color palette for visualizing accessibility data. var accessibilityPalette = ['f2fef8', 'defce1', 'c9f3bc', 'cbeca7', 'd6e793', 'e2d87b', 'd4a561', 'c46c49', 'ab3a38', '922f4b', '7d285d', '672069', '3a1453', '1b0c3c', '050526', '00030f', '000000']; // Apply the color palette to the log of travel time. var accessibilityVis = {min: 0, max: 10, palette: accessibilityPalette}; var logAccessibility = accessibility.where(accessibility.gt(0), accessibility.log()); var accessibilityRgb = logAccessibility.visualize(accessibilityVis); // Composite onto a solid-color background to fill in the oceans. var background = ee.Image(0).visualize({palette: ['11101e']}); var accessibilityBlended = background.blend(accessibilityRgb).updateMask(1); // Check the visualization. Map.addLayer(accessibilityBlended, {}, 'accessibilityBlended'); // Define an export region. var exportRegion = ee.Geometry.Rectangle([34, -3, 40, 1]); Map.centerObject(exportRegion); Map.addLayer(exportRegion, {}, 'exportRegion'); // Export the visualization image as map tiles. Export.map.toCloudStorage({ // All tiles that intersect the region get exported in their entirety. // Clip the image to prevent low resolution tiles from appearing outside // of the region. image: accessibilityBlended.clip(exportRegion), description: 'mapToCloudExample', bucket: 'your-bucket-name', maxZoom: 13, region: exportRegion }); Note that this creates a new directory in the specified Cloud Storage bucket, named according to the description parameter by default. You can change the name of the directory or specify subdirectories with the path parameter.
To allow public access (and Earth Engine app access) to your tiles, the exported files will be public by default (you are assumed to be the owner of the output bucket). If you are a writer on the specified output bucket (but not the owner), set writePublicTiles to false to use the output bucket's default object ACL. ACLs and CORS can be set from the writePublicTiles and bucketCorsUris parameters, respectively, or from the export dialog:
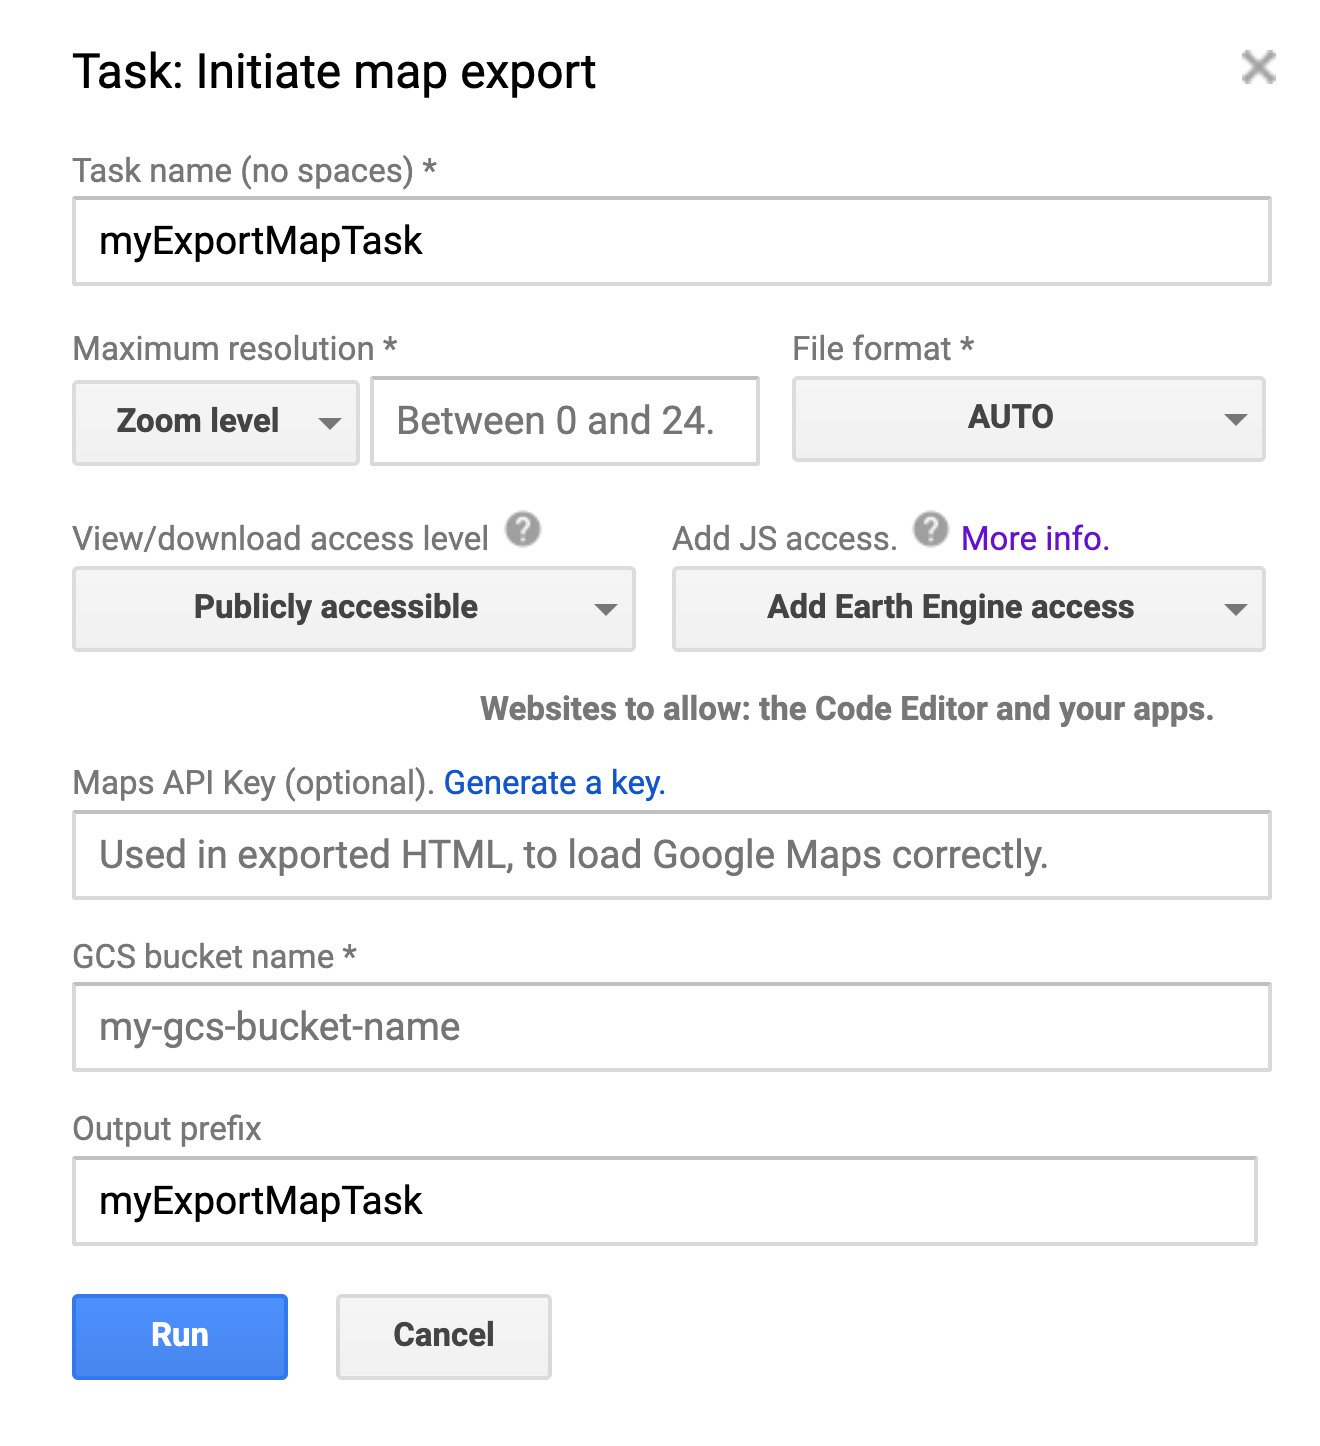
Export.map.toCloudStorage() dialog.ACLs and CORS options details
- View/download access. If you want access at all (e.g. from the Code Editor or EE Apps), then you will need to make the tiles 'Publicly accessible.'
- JS access. The bucket into which the map is exported must allow for readability by other web apps if you want the Code Editor or EE Apps to have access to the tiles. These cross-origin request settings (CORS) must be configured at the bucket level (learn more). For convenience, the Earth Engine export dialog allows you to configure CORS for your bucket at the time of export.
After the export in the previous example has successfully completed, the output directory will contain a file like this index.html file that displays the exported map using the Google Maps Platform JavaScript API. If you provided a Maps Platform API Key at the time of export, this page is publicly viewable, can be embedded on other pages, and does not require the viewer to be a registered Earth Engine user. If you did not provide an API Key, your exported map tiles will display over watermarked Google Basemap tiles.
The output directory will also contain a file like this earth.html file. The earth.html file is a page containing a link to the display of your map in Google Earth. To view your data in Google Earth, click the Open in Google Earth link on the earth.html page. To download a KML file that contains a link to your data, click the in Google Earth and select 'Export as KML file'.
You can share your dataset by sharing the link to the earth.html file, by sharing the Open in Google Earth link, or by sharing the downloaded KML file. The actual data tiles are served from Google Cloud Storage, and Google Earth will read them from there.
Scale and Zoom
Note that in the previous example, maxZoom is set to 13. Zoom levels correspond to different sized grids of pixels with which to display a global map. (See this reference for details.) Due to Earth's curvature, the resolution of pixels at a given zoom level varies by latitude. Specifically, meters per pixel goes down by a factor of cos(latitude). The following table shows meters per pixel, at each zoom level, at the equator for the Google Mercator projection:
| Zoom Level | Pixel Size (at equator) |
|---|---|
| 0 | 156 km |
| 1 | 78 km |
| 2 | 39 km |
| 3 | 20 km |
| 4 | 10 km |
| 5 | 4.9 km |
| 6 | 2.4 km |
| 7 | 1.2 km |
| 8 | 611 m |
| 9 | 305 m |
| 10 | 152 m |
| 11 | 76 m |
| 12 | 38 m |
| 13 | 19 m |
| 14 | 9.6 m |
| 15 | 4.8 m |
| 16 | 2.4 m |
| 17 | 1.2 m |
| 18 | 0.6 m |
| 19 | 0.3 m |
| 20 | 0.15 m |
Observe from the previous table that the maxZoom set in the example corresponds to 19 meters at the equator, smaller at higher latitudes. This is less than the nominal 30 arc-seconds per pixel resolution of the input image. As a result, the map displayed in the output index.html can be zoomed in until pixels in native resolution are visible in the map. To limit the map display to native pixel resolution, set maxZoom to a value that corresponds to the native resolution or less.
Source: https://developers.google.com/earth-engine/guides/exporting
Posted by: fiveincludable.blogspot.com